Breakout Season (BOS) is a website for creating and managing NBA fantasy leagues. The scoring system and competition format should feel intuitive to anyone with fantasy experience, but there are a few specifics worth knowing.
BREAKOUT SEASON FEATURES
We'll summarize the distinctive features of BOS leagues, especially what's essential to properly evaluate players and draft with a clear plan.
- Breakout Season is a head-to-head (H2H) league. There is a regular season followed by Playoffs that determine the champion.
- Breakout Season is a points league. Across BOS scoring periods (which span several NBA days), players accumulate points based on their efficiency: points + rebounds + assists + steals + blocks - missed field goals - turnovers. A player's score in a BOS matchup is the efficiency they average over their NBA games during that scoring period. That score is then adjusted by several factors based on role (starter / bench), whether the BOS team is home or away, the position used, whether the player missed any games, and whether they, a teammate, or an opponent has a specific badge. We'll detail and illustrate the scoring system below.
- Breakout Season is a salary-cap league. Each player has an assigned salary. During the draft there is a soft cap of 90 million, which teams may only reach via minimum contracts (1 million). The hard cap is 100 million and cannot be reached.
- Breakout Season uses the classic positions (PG, SG, SF, PF, C), applied via percentages to express how well a player fits each position. For example, a pure point guard (e.g., Chris Paul) might be 100% PG, 75% SG, and 0% at the others. Some players will be 100% at multiple positions. In the lineups section you'll see why this matters.
- In Breakout Season, players can have badges that modify their own score, their teammates' scores, or their opponents' scores.
BOS TIP: During the draft, prioritize a player's ability to generate efficiency, their salary, and the positions where they have high percentages. Also weigh factors like their NBA role and injury history.
Now that you know the basics, let's go step by step.
SCORING
- The score of a player in a BOS matchup is based on their efficiency: points + rebounds + assists + steals + blocks - missed field goals - turnovers. We will compute the average efficiency in NBA games played during a scoring period, which typically lasts five days.
- DNPs (games the player did not play) negatively impact the score via a 10% deduction for each missed game.
- A player is only substituted if they miss all NBA games in a BOS matchup. Substitution rules are explained in the lineups section.
- ATTENTION: If an NBA game is postponed, it is removed from the game entirely, as if it were never scheduled.
- Negative efficiency is treated as 0.
- A positional-percentage correction is applied to each player.
- An additional correction applies based on whether the player is a starter or a bench player and whether their BOS team is home or away:
- Home: 100% / 70%
- Away: 95% / 65%
- The home/away correction favors the home team even more during the playoffs.
- Final player scores are always integers.
- In case of a tie, the player with the higher efficiency average (before any modifications) is awarded one extra point.
Example
In an away matchup, we start Giannis Antetokounmpo as our SF. Giannis has 3 NBA games during that BOS matchup. In the first he posts 20 efficiency points. The second is a back-to-back and Budenholzer rests him. In the third he posts 30 efficiency points. His BOS matchup efficiency average is 25. Here's how adjustments apply to get his actual team score:
- From that 25 average, subtract 10% (2.5 points) for the missed game, lowering it to 22.5.
- We used him at SF, where he's 97%, so subtract another 3% (0.675 points).
- Since our team is away, starters score at 95%, so subtract another 5% (1.09125 points).
- The result of these corrections is 20.73375. BOS scores are always integers, so Giannis Antetokounmpo adds 21 BSP (Breakout Season Points) for that matchup.
BADGES
- Some players have one or more badges based on their real-world quality and performance.
- These badges can modify their own score, their teammates' scores, or the score of specific opponents in a given matchup.
- Badges only take effect if the player actually plays.
- These are the currently active badges:
| Name | Effect | How it works | Levels | Boxscore impact |
|---|---|---|---|---|
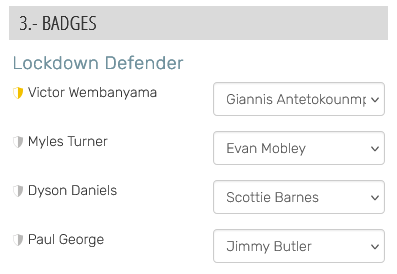
| Lockdown defender |
Subtracts a % of points from a user-assigned opposing player | The user assigns each defender with this badge to a rival player. For the assignment to be valid, both defender and target must share at least one position at 90% or higher. | 3 | Starter: -15%. Bench: -7.5% |
| 2 | Starter: -10%. Bench: -5% |
|||
| 1 | Starter: -5%. Bench: -2% |
|||
| Floor general |
Boosts the overall performance of a unit (starters or bench) by adding a % of the sum of the four teammates' scores. | Only one player per unit can act as Floor General. It will be the one with the highest badge level. If two players in the same unit share the same level, the Floor General will be the player with the higher efficiency average during the matchup. | 3 | +5% |
| 2 | +2% | |||
| 1 | +1% |
Examples
Lockdown defender
We have two players with the lockdown defender badge: Marcus Smart () and Bam Adebayo (). Adebayo starts, while Marcus Smart is our backup point guard.
- If we assign Bam Adebayo to Joel Embiid and, after all the computations outlined earlier, Embiid lands on 20 BSP, his final score becomes: 20 - (10% of 20) = 18.
- If we put Marcus Smart on James Harden and Harden initially has 30 BSP, his final score becomes: 30 - (7.5% of 30) = 27.75 (rounded to 28).
Floor general
We have two players with the floor general badge: Luka Doncic () and TJ McConnell (). We start TJ McConnell at PG and Doncic at SG.
- The badge affecting the other starters will be Doncic's (the higher level), so +5% of the sum of the starters' BSP (after all necessary transformations), including McConnell, is added to the team score.
- If we had McConnell as the backup PG, his badge would also activate and affect the bench unit. In addition to the starters' +5% from Doncic, we would add +1% of the sum of the bench teammates' BSP thanks to McConnell's level-1 badge.
BOXSCORES
Boxscores show you the matchup result and exactly how it was calculated.

Screen 1

Screen 2

Screen 3

Screen 4

Screen 5
- At a glance, the main screen (Screen 1) shows the matchup result and each player's score. If the matchup hasn't finished, you'll also see a progress bar showing how much remains (how many NBA games are still to be played).
- You can check each team's details by clicking “Home in-depth” (or “Away”). The first thing you'll see (Screen 2) is the breakdown of each player's score: Total efficiency, games played, average efficiency in those games, % corrections applied (Position, Role, and DNP), and finally any badge score added or subtracted.
- If you click a player's or team's badge score, you'll see the details: which badges activated, for which player, and the exact score from each (Screen 3).
- By clicking the blue calendar button you can see each player's efficiency by NBA game (Screen 4).
- And if, on that screen, you click one of the days (D1, D2, D3…), you can view the full boxscores for that date (Screen 5).
ROSTERS
- Rosters have a maximum of 15 players. 12 are selected via draft, whose order is set by lottery. Remaining players can be signed through an auction process. You can also trade draft picks and players.
- During the draft, each player has an assigned salary, the result of an algorithm attempting to match their recent performance value. After the draft, free agents will demand a minimum salary to consider offers. The free-agent bidding system is explained later.
- During the draft there's a soft cap, normally of 90 million. A team may only reach or exceed this via minimum-salary players (1 million). The hard cap, which may never be reached, is 100 million.
- Players have percentage ratings from 0 to 100 for each of the five positions (PG, SG, SF, PF, C). That percentage is applied to their efficiency as explained in the scoring section.
LINEUPS
Every matchup requires a defined lineup. At the top of the LINEUP screen you'll see which BOS matchup the lineup you're saving will apply to. If you can't save a lineup for a specific matchup, don't worry: the system will retrieve your most recent valid lineup and use it.
To set your lineup, complete several steps organized into blocks:

Block 1 — “Choose your 13 players for this game”:
- Here you choose the 13 players you'll dress for the matchup and who remains inactive (and thus will never score). At the top of this block there are three buttons to toggle the info shown (positions, efficiency, calendar) for each player to help your decisions.
- Order players with the up/down arrows that appear when you select a player by clicking their row.
- Select your 13 dressed players; order doesn't matter here.
- If you see an alert () next to a player's name, it means they did not play the most recent NBA game.
- Inactive players (not dressed) appear at the bottom and will not score.
- If, when setting a lineup, a team has more than 15 players on the roster, the user must place at the very bottom those players to be cut to return to the 15-player maximum. When saving the lineup, any players from the 16th slot downward in this block will be waived and become free agents.
Block 2 — “Define your depth chart”
- In this block you configure the starting five and your rotation. A maximum of 5 starters and 5 bench players will score: one starter and one bench player per position. The screen behaves like a traditional depth chart - we have to set players in each of the five positions by priority.
- Click a position cell (e.g., PG) to open a window showing only players eligible for that position among those you dressed.
- To move players up/down, click the player's row and use the buttons at the top. When finished, click SELECT to close.
- Order with these rules in mind:
- The player in the 1st slot is the starter at that position. Starters score 100% at home and 95% away.
- The 2nd slot is the bench player and first replacement if the starter slot opens. Bench players score 70% at home and 65% away.
- 3rd and below won't score unless a starter or bench slot becomes available.
- Additional notes for building the depth chart:
- Players with multiple positions can fill several bench “slots”. For example, Aaron Gordon can appear as SF and PF in your depth chart.
- A player can only fill one starting position.
- A player can start at one position and also appear as a bench option at other position(s).
- If the same player is aligned with the same priority in different positions (e.g., Draymond Green as 1st bench SF and 1st bench PF), the system will require you to prioritize those positions. Do this by clicking the player's name in the position you want to prioritize.
- When applying rotations in case of a DNP, the system will calculate the final lineup that best matches the priorities you've set, ensuring above all that no position (starter or substitute) is left unassigned.
- One last key rule: a player set as a starter will never move to a bench role at another position, though they may become a starter at a different position.

Example
Look at the depth chart above. If there are no injuries the starters would be Westbrook, Doncic, Holiday, Love, and KAT. With what we've learned, let's answer a few questions:
- If Russell Westbrook doesn't play, who are the starting and bench PG? Easy: according to the depth chart, Chris Paul becomes the starter and Terry Rozier the backup.
- If Dejounte Murray doesn't play, who is the SG backup? Jrue Holiday appears just below Murray, but a starter never leaves their starting role to become a bench player, so the SG backup would be the next one: Josh Richardson.
- What if neither Murray nor Holiday plays? The system will seek the best lineup by your priorities — that is, the combination using players listed higher in the depth chart. Here, the best option to replace Holiday as starter is clearly Draymond Green, making Larry Nance the PF backup. For SG and SF backups we have two options: Richardson-Gay or Rozier-Richardson. The priorities tie (4+4 = 5+3), which the system resolves by choosing the combo with the highest-prioritized individual—in this case Josh Richardson, who sits third in the depth chart. So Richardson becomes SF bench and, by elimination, Rozier becomes SG bench.
- And what if KAT doesn't play? Since Kevin Love is the first C backup, he becomes the starting C; PF backup is Larry Nance, and SF backup is Rudy Gay.
Now focus on Draymond Green. By prioritizing Green as SF backup (the “1” behind his name), we are deciding several things:
- Green will play as SF backup unless absences force him to move elsewhere.
- If both SF and PF starting players miss the BOS matchup, Draymond Green becomes the starting SF.
- If Holiday starts as SF but Love is out (or shifts to starting C due to Towns' absence), Green would then become the starting PF (and thus Josh Richardson becomes SF backup and Larry Nance PF backup).
BOS TIP: Don't panic: after a bit of practice you'll master building a good depth chart. Focus mainly on the first three rows, where your best players should sit. Also, if you update lineups regularly and remove injured players, DNPs are less common. Remember: to trigger a DNP-based substitution the player must miss all NBA games in the BOS matchday.
Block 3 — “Badges”
- In the third block you configure badges for your dressed players.
- Some badges depend on the opponent. If you don't set a lineup for a specific matchup, those badge effects will not apply.
BOS TIP: Lineup is crucial in BOS. Fine-tune your depth chart to maximize points and to protect against absences, ensuring optimal rotations when players miss time. If you don't set a lineup for a matchup, some badge effects won't apply and you'll lose some valuable points.
THE DRAFT
The road to success in any fantasy league starts with a good draft. Now that you know how the league works, you're ready to make your picks. Here's how our drafts work.
Draft order is set by lottery. The commissioner can configure the time users have to make their picks; a countdown displays on the draft page while each user is on the clock. The commissioner can also set draft pause windows (e.g., 23:00 to 8:00) during which the user's clock does not run (manual picks can still be made).
When it's a user's turn, they have 10 minutes to pick manually before the first player on their contingency list is assigned. The list (MY LIST) helps ensure you get a desired player and avoid autopick.
If no list is available, the system will allow a maximum pick window configured by the commissioner, after which a player is assigned via autopick. Users can also build a “BLACK LIST” on the draft page: up to 20 players they absolutely do not want assigned via autopick.
The DRAFT page
The draft page gives users a lot of information and actions.

- On the clock: Shows the team currently picking and the remaining time.
- Draft Board: The draft grid, showing order and picks already made.
- Available Players: A list of players not yet drafted and a search tool () to filter results. The list shows 50 results by default and can be expanded via “Load more…”. For each available player you'll see:
- Last season's average efficiency
- Number of games played last season
- Salary
- Percentage eligibility for each of the five positions
- My picks: Your selections so far.
- Draft Summary: Quick view of recent picks, the team on the clock, and upcoming turns.
- My draft summary: Your draft info: next turn, players remaining to pick, and salary left under the soft cap.
- My list: A contingency ranked list you build by preference. If you have a list when your turn arrives, the first player on it is assigned. Before the assignment, you have 10 minutes to make a manual pick that can differ from this contingency list.
- Add players to MY LIST: in Available Players, click the '+' in the players 'Add' column.
- Remove players from MY LIST: either click the '−' in the player's Add column, or select the player in MY LIST and click the 'X'. Click SAVE to apply changes.
- Reorder MY LIST: select a player in MY LIST and move them with the up/down arrows on the right.
- Undo changes: if you've made unsaved changes, click 'Reset' to revert to the last saved state.
- Don't forget to always click save to apply any changes
- MY BLACK LIST: Used only to indicate which players cannot be assigned to your team via autopick.
- Manage the list: expand MY BLACK LIST. In the 'Available Players' tab the 'Add' column becomes 'Black' and an 'X' appears next to each player.
- Add players: click the 'X' in the 'Black' column.
- Remove players: select the player in MY BLACK LIST and click the 'X' button on the right.
- Undo changes: if you've made unsaved changes, click 'Reset' to revert to the last saved state.
- Don't forget to always click save to apply any changes
AUTOPICK (or not...)
The commissioner can choose between two possible actions when the time to make a pick runs out:
- AUTOPICK: The system automatically assigns a player. Autopick will look for the most efficient player in the position you have least covered among all those whose salary keeps you under the soft cap.
- Skip the turn: The turn simply passes and the draft process continues. The next team can already make its pick (either directly or from a list), and the team that missed its turn will be able to pick at that spot when it reconnects — though with fewer players available.
BOS TIP: Use the draft page tools: search filters, your contingency list, and your blacklist. Put on your Black List players coming off strong seasons but currently injured, or any others you shouldn't take.
BOS FREE AGENCY
Rosters have a maximum of 15 players, 12 of whom are drafted. The rest can be signed once free agency opens through a system of blind auctions. BOS users manage these moves on the “GM Office” screen.
Free-agent salaries
- Each free agent has a minimum salary that varies during the season based on performance. Free agents won't accept offers below that figure.
- Free agents have no maximum salary, but teams may not place an offer that would put them at or above the 100 million hard cap if they sign the player.
- You are able to place multiple offers whose total exceeds your remaining salary room, since offers resolve sequentially and the system will never allow a team to hit 100 million in salaries. If signing a player would invalidate any of your other offers (because winning them would take you to the hard cap), the system automatically removes the invalid ones.
Bids
- Users place bids in the “GM Office.”
- In the 'PLAYERS' tab you can view the full player list and use filters () to show only free agents. For each player you'll see, in addition to essentials (efficiency, games played, positions), two buttons:
- Bid (): opens a window showing the player's minimum salary and lets you enter your bid. This button is only available for free agents without an active auction.
- Watchlist (): adds the player to your watch list. After adding, save the list in the “MY WATCH LIST” module.
- The 'OPEN BIDS' tab shows active auctions. You can modify your bids and join auctions started by others.
- The 'CLOSED DEALS' tab lists completed auctions.
Free agency may (at the commissioner's decision) have two phases:
- Full open free agency
- Once the free agency opens, teams can send offers to available free agents (filter by FA in the 'PLAYERS' tab of GM Office).
- The team that initiates an auction for a player gets a +20% boost in their offer's value. This bonus persists even if that team modifies their bid later.
- When making a bid, you can select players to waive in case you win. You can even submit multiple bids with the same player to waive. However, as soon as you win one bid and that player is waived, the rest of your bids that relied on waiving that player become invalid.
Example
You lack salary room but you want to upgrade your PG position with De'Anthony Melton or Derrick White instead of Monte Morris. Rather than waiving Morris first (risking losing him for nothing), the system lets you mark him as the “player to cut” in both bids. If you bid on Melton first and win, the system automatically waive Morris and invalidates your bid for Derrick White. If another team outbids you for Melton, you could still sign Derrick White by waiving Morris; if you win neither, you keep Morris.
- When a player receives an offer, it appears in 'OPEN BIDS' and other teams can send their bids during the next 24 hours.
- After 24 hours, the players signs for the team which the best offer.
- Pre-free agency
- Before fully opening the free agency, the commissioner can define a preliminary phase. This avoids a “stampede” at the opening minute for the +20% bonus.
- During the pre-free agency phase (often 2 days), teams can submit bids for any free agent, provided they have the necessary salary room.
- All bids submitted in this period receive the +20% valuation bonus.
- After 48 hours (or the period set by the commissioner), the list of players who received bids is published.
- Teams then have an extra 24 hours to modify or delete their bids and to join auctions initiated by others. These later bids do not receive the +20% bonus, even if you only modify your own bid. After 24 hours, players are assigned to the winning teams.
- Auctions in the pre-free agency resolve starting with the player with the highest winning bid, then descending.
Example
The Sant Boi Flying Birds and the Tarrako Scoundrels both need a PG and each has 3.5 of free salary room. TJ McConnell is performing well and Sant Boi offers 3.1, above his minimum salary. Tarrako later notices the McConnell auction and offers 3.4.
Just in case, Sant Boi also offers 2 to Brandon Williams and Tarrako offers 1.5 to Miles McBride.
When McConnell's auction ends, he joins the Sant Boi Flying Birds because their bid value (3.1 + 20% = 3.72 beats Tarrako's 3.4). Since Sant Boi's remaining room is now only 0.4, the system invalidates the Brandon Williams bid. When Williams' auction ends, it turns out he received no valid offers and remains a free agent. Meanwhile, the Tarrako Scoundrels win the Miles McBride auction and add him to their roster.
Ties between top-valued offers
If a player has multiple offers tied for top valuation, the winner is the team that submitted its offer first.
Exceeding the roster limit
The system does not prevent a team from temporarily exceeding 15 players via free agency. If this happens, the user can waive surplus players in two ways:
- On the corresponding player screen, using the WAIVE button ().
- When saving the next lineup, the system will require you to waive enough players to return to the 15-player limit.
Once a team waive a player, it may not bid on that same player again for at least 15 days.
BOS TIP: Salary from waive players is fully cleared. This lets you recover from a poor draft via free agency and trades.
TRADES
In Breakout Season you can trade both draft picks and players. From MY CONVERSATIONS screen inside MY LEAGUE you can message other users and attach a trade offer. Click NEW CONVERSATION, select a team, and click PROPOSE TRADE to choose the players or picks for your offer.
You can also initiate a trade from the PLAYERS tab in GM OFFICE by clicking the button next to the player you want.
The system prevents sending or accepting any trade that would place a team at or above the salary cap limit.
BOS TIP: Trades are a great way to balance your roster if you have a surplus at a given position.